Vue Lifecycle Hooks
Vue 中的生命週期鉤子是元件生命週期中的特定階段,我們可以在其中新增程式碼執行操作。
生命週期鉤子
每次元件達到生命週期的某個新階段時,都會執行一個特定的函式,我們可以將程式碼新增到該函式中。這些函式被稱為生命週期鉤子,因為我們可以將我們的程式碼“鉤入”該階段。
元件擁有的所有生命週期鉤子如下
beforeCreatecreatedbeforeMountmountedbeforeUpdateupdatedbeforeUnmountunmountederrorCapturedrenderTrackedrenderTriggeredactivateddeactivatedserverPrefetch
以下是這些生命週期鉤子的示例。
“beforeCreate”鉤子
beforeCreate 生命週期鉤子發生在元件初始化之前,因此是在 Vue 設定了元件的資料、計算屬性、方法和事件監聽器之前。
beforeCreate 鉤子可用於設定全域性事件監聽器,但我們應避免在 beforeCreate 生命週期鉤子中嘗試訪問屬於元件的元素,例如資料、觀察者和方法,因為它們在該階段尚未建立。
此外,嘗試從 beforeCreate 生命週期鉤子訪問 DOM 元素沒有意義,因為它們直到元件被 mounted 之後才建立。
示例
CompOne.vue:
<template>
    <h2>Component</h2>
    <p>This is the component</p>
    <p id="pResult">{{ text }}</p>
</template>

<script>
export default {
	data() {
		return {
			text: '...'
		}
	},
  beforeCreate() {
		this.text = 'initial text'; // This line has no effect
    console.log("beforeCreate: The component is not created yet.");
  }
}
</script>
App.vue:
<template>
  <h1>The 'beforeCreate' Lifecycle Hook</h1>
  <p>We can see the console.log() message from 'beforeCreate' lifecycle hook, but there is no effect from the text change we try to do to the Vue data property, because the Vue data property is not created yet.</p>
  <button @click="this.activeComp = !this.activeComp">Add/Remove Component</button>
  <div>
    <comp-one v-if="activeComp"></comp-one>
  </div>
</template>

<script>
export default {
  data() {
    return {
      activeComp: false
    }
  }
}
</script>

<style>
#app > div {
  border: dashed black 1px;
  border-radius: 10px;
  padding: 10px;
  margin-top: 10px;
  background-color: lightgreen;
}
#pResult {
  background-color: lightcoral;
  display: inline-block;
}
</style>
在上面的示例中,CompOne.vue 檔案第 15 行無效,因為我們在該行嘗試更改 Vue 資料屬性中的文字,但 Vue 資料屬性實際上尚未建立。另外,請記住開啟瀏覽器控制檯以檢視第 16 行 console.log() 呼叫的結果。
“created”鉤子
created 生命週期鉤子發生在元件初始化之後,因此 Vue 已經設定了元件的資料、計算屬性、方法和事件監聽器。
我們應避免在 created 生命週期鉤子中嘗試訪問 DOM 元素,因為直到元件被 mounted 之後才能訪問 DOM 元素。
created 生命週期鉤子可用於透過 HTTP 請求獲取資料,或設定初始資料值。如下面的示例所示,資料屬性 'text' 被賦予了初始值
示例
CompOne.vue:
<template>
    <h2>Component</h2>
    <p>This is the component</p>
    <p id="pResult">{{ text }}</p>
</template>

<script>
export default {
	data() {
		return {
			text: '...'
		}
	},
  created() {
		this.text = 'initial text';
    console.log("created: The component just got created.");
  }
}
</script>
App.vue:
<template>
  <h1>The 'created' Lifecycle Hook</h1>
  <p>We can see the console.log() message from 'created' lifecycle hook, and the text change we try to do to the Vue data property works, because the Vue data property is already created at this stage.</p>
  <button @click="this.activeComp = !this.activeComp">Add/Remove Component</button>
  <div>
    <comp-one v-if="activeComp"></comp-one>
  </div>
</template>

<script>
export default {
  data() {
    return {
      activeComp: false
    }
  }
}
</script>

<style>
#app > div {
  border: dashed black 1px;
  border-radius: 10px;
  padding: 10px;
  margin-top: 10px;
  background-color: lightgreen;
}
#pResult {
  background-color: lightcoral;
  display: inline-block;
}
</style>
“beforeMount”鉤子
beforeMount 生命週期鉤子發生在元件被 mounted 之前,也就是元件被新增到 DOM 之前。
我們應避免在 beforeMount 生命週期鉤子中嘗試訪問 DOM 元素,因為直到元件被 mounted 之後才能訪問 DOM 元素。
下面的示例表明我們尚無法訪問元件中的 DOM 元素,CompOne.vue 檔案第 11 行不起作用,並在瀏覽器控制檯中產生錯誤
示例
CompOne.vue:
<template>
    <h2>Component</h2>
    <p>This is the component</p>
    <p ref="pEl" id="pEl">We try to access this text from the 'beforeMount' hook.</p>
</template>

<script>
export default {
  beforeMount() {
    console.log("beforeMount: This is just before the component is mounted.");
    this.$refs.pEl.innerHTML = "Hello World!"; // <-- We cannot reach the 'pEl' DOM element at this stage
  }
}
</script>
App.vue:
<template>
  <h1>The 'beforeMount' Lifecycle Hook</h1>
  <p>We can see the console.log() message from the 'beforeMount' lifecycle hook, but the text change we try to do to the 'pEl' paragraph DOM element does not work, because the 'pEl' paragraph DOM element does not exist yet at this stage.</p>
  <button @click="this.activeComp = !this.activeComp">Add/Remove Component</button>
  <div>
    <comp-one v-if="activeComp"></comp-one>
  </div>
</template>

<script>
export default {
  data() {
    return {
      activeComp: false
    }
  }
}
</script>

<style>
#app > div {
  border: dashed black 1px;
  border-radius: 10px;
  padding: 10px;
  margin-top: 10px;
  background-color: lightgreen;
}
#pEl {
  background-color: lightcoral;
  display: inline-block;
}
</style>
“mounted”鉤子
元件新增到 DOM 樹後,會立即呼叫 mounted() 函式,我們可以將我們的程式碼新增到該階段。
這是我們第一次可以處理與元件相關的 DOM 元素,例如使用 ref 屬性和 $refs 物件,如下面的第二個示例所示。
示例
CompOne.vue:
<template>
  <h2>Component</h2>
  <p>Right after this component is added to the DOM, the mounted() function is called and we can add code to that mounted() function. In this example, an alert popup box appears after this component is mounted.</p>
  <p><strong>Note:</strong> The reason that the alert is visible before the component is visible is because the alert is called before the browser gets to render the component to the screen.</p>
</template>

<script>
export default {
  mounted() {
    alert("The component is mounted!");
  }
}
</script>
App.vue:
<template>
  <h1>The 'mounted' Lifecycle Hook</h1>
  <button @click="this.activeComp = !this.activeComp">Create component</button>
  <div>
    <comp-one v-if="activeComp"></comp-one>
  </div>
</template>

<script>
export default {
  data() {
    return {
      activeComp: false
    }
  }
}
</script>

<style scoped>
  div {
    border: dashed black 1px;
    border-radius: 10px;
    padding: 20px;
    margin: 10px;
    width: 400px;
    background-color: lightgreen;
  }
</style>
注意: mounted 階段發生在元件被新增到 DOM之後,但在上面的示例中,alert() 在我們看到元件之前可見。原因是首先將元件新增到 DOM,但在瀏覽器渲染該元件到螢幕之前,會發生 mounted 階段,alert() 變得可見並暫停瀏覽器渲染元件。
下面是一個可能更有用的示例:在表單元件掛載後將游標置於輸入欄位中,以便使用者可以直接開始輸入。
示例
CompOne.vue:
<template>
  <h2>Form Component</h2>
  <p>When this component is added to the DOM tree, the mounted() function is called, and we put the cursor inside the input element.</p>
  <form @submit.prevent>
    <label>
      <p>
        Name: <br>
        <input type="text" ref="inpName">
      </p>
    </label>
    <label>
      <p>
        Age: <br>
        <input type="number">
      </p>
    </label>
    <button>Submit</button>
  </form>
  <p>(This form does not work, it is only here to show the mounted lifecycle hook.)</p>
</template>

<script>
  export default {
    mounted() {
      this.$refs.inpName.focus();
    }
  }
</script>
“beforeUpdate”鉤子
每當元件資料發生變化時,就會呼叫 beforeUpdate 生命週期鉤子,但在更新渲染到螢幕之前。beforeUpdate 生命週期鉤子發生在 updated 生命週期鉤子之前。
beforeUpdate 鉤子有一個特別之處,那就是我們可以對應用程式進行更改而不觸發新的更新,這樣可以避免出現無限迴圈。這就是為什麼不應在 updated 生命週期鉤子中更改應用程式的原因,因為使用該鉤子會建立無限迴圈。只需檢視此處下方第三個示例(紅色部分)。
示例
beforeUpdate() 函式將一個 <li> 標籤新增到文件中,以指示 beforeUpdate() 函式已執行。
CompOne.vue:
<template>
  <h2>Component</h2>
  <p>This is the component</p>
</template>
App.vue:
<template>
  <h1>The 'beforeUpdate' Lifecycle Hook</h1>
  <p>Whenever there is a change in our page, the application is 'updated' and the 'beforeUpdate' hook happens just before that.</p>
  <p>It is safe to modify our page in the 'beforeUpdate' hook like we do here, but if we modify our page in the 'updated' hook, we will generate an infinite loop.</p>
  <button @click="this.activeComp = !this.activeComp">Add/Remove Component</button>
  <div>
    <comp-one v-if="activeComp"></comp-one>
  </div>
  <ol ref="divLog"></ol>
</template>

<script>
export default {
  data() {
    return {
      activeComp: true
    }
  },
  beforeUpdate() {
    this.$refs.divLog.innerHTML += "<li>beforeUpdate: This happened just before the 'updated' hook.</li>";
  }
}
</script>

<style>
#app > div {
  border: dashed black 1px;
  border-radius: 10px;
  padding: 10px;
  margin-top: 10px;
  background-color: lightgreen;
}
</style>
“updated”鉤子
在我們的元件更新了 DOM 樹之後,就會呼叫 updated 生命週期鉤子。
示例
updated() 函式使用 console.log() 寫入一條訊息。每次頁面更新時都會發生這種情況,在本例中,每次元件新增或移除時都會發生。
CompOne.vue:
<template>
  <h2>Component</h2>
  <p>This is the component</p>
</template>
App.vue:
<template>
  <h1>The 'updated' Lifecycle Hook</h1>
  <p>Whenever there is a change in our page, the application is updated and the updated() function is called. In this example we use console.log() in the updated() function that runs when our application is updated.</p>
  <button @click="this.activeComp = !this.activeComp">Add/Remove Component</button>
  <div>
    <comp-one v-if="activeComp"></comp-one>
  </div>
</template>

<script>
export default {
  data() {
    return {
      activeComp: true
    }
  },
  updated() {
    console.log("The component is updated!");
  }
}
</script>

<style>
#app {
  max-width: 450px;
}
#app > div {
  border: dashed black 1px;
  border-radius: 10px;
  padding: 10px;
  margin-top: 10px;
  width: 80%;
  background-color: lightgreen;
}
</style>
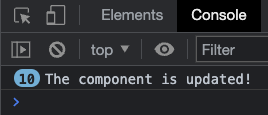
單擊“新增/移除元件”按鈕 10 次後,我們可以在瀏覽器控制檯中看到結果
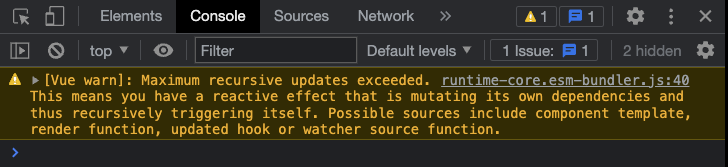
注意:我們在呼叫 updated 生命週期鉤子時必須小心,不要修改頁面本身,否則頁面將一遍又一遍地更新,從而建立無限迴圈。
讓我們嘗試看看如果我們做的與上面注意事項所警告的完全一樣會發生什麼。頁面會無限更新嗎?
示例
updated() 函式將文字新增到段落中,這又會再次更新頁面,並且該函式一遍又一遍地執行,形成一個無限迴圈。幸運的是,您的瀏覽器最終會停止這個迴圈。
CompOne.vue:
<template>
  <h2>Component</h2>
  <p>This is the component</p>
</template>
App.vue:
<template>
  <h1>The 'updated' Lifecycle Hook</h1>
  <p>Whenever there is a change in our page, the application is updated and the updated() function is called.</p>
  <p>The first change that causes the updated hook to be called is when we remove the component by clicking the button. When this happens, the update() function adds text to the last paragraph, which in turn updates the page again and again.</p>
  <button @click="this.activeComp = !this.activeComp">Add/Remove Component</button>
  <div>
    <comp-one v-if="activeComp"></comp-one>
  </div>
  <div>{{ text }}</div>
</template>

<script>
export default {
  data() {
    return {
      activeComp: true,
      text: "Hello, "
    }
  },
  updated() {
    this.text += "hi, ";
  }
}
</script>

<style>
#app {
  max-width: 450px;
}
#app > div {
  border: dashed black 1px;
  border-radius: 10px;
  padding: 10px;
  margin-top: 10px;
  width: 80%;
  background-color: lightgreen;
}
</style>
當您在本地機器上以開發模式執行上面的程式碼時,Chrome 瀏覽器的控制檯警告如下
“beforeUnmount”鉤子
beforeUnmount 生命週期鉤子在元件從 DOM 中移除之前被呼叫。
正如我們在下面的示例中看到的,我們仍然可以在 beforeUnmount 鉤子中訪問 DOM 中的元件元素。
示例
CompOne.vue:
<template>
  <h2>Component</h2>
  <p ref="pEl">Strawberries!</p>
</template>

<script>
export default {
  beforeUnmount() {
    alert("beforeUnmount: The text inside the p-tag is: " + this.$refs.pEl.innerHTML);
  }
}
</script>
App.vue:
<template>
  <h1>Lifecycle Hooks</h1>
  <button @click="this.activeComp = !this.activeComp">{{ btnText }}</button>
  <div>
    <comp-one v-if="activeComp"></comp-one>
  </div>
</template>

<script>
export default {
  data() {
    return {
      activeComp: true
    }
  },
  computed: {
    btnText() {
      if(this.activeComp) {
        return 'Remove component'
      }
      else {
        return 'Add component'
      }
    }
  }
}
</script>

<style scoped>
  div {
    border: dashed black 1px;
    border-radius: 10px;
    padding: 20px;
    margin: 10px;
    width: 400px;
    background-color: lightgreen;
  }
</style>
“unmounted”鉤子
元件從 DOM 中移除之後,就會呼叫 unmounted 生命週期鉤子。
此鉤子可用於例如移除事件監聽器或取消計時器或間隔。
當元件被 unmounted 時,會呼叫 unmounted() 函式,我們可以將我們的程式碼新增到其中
示例
CompOne.vue:
<template>
  <h2>Component</h2>
  <p>When this component is removed from the DOM tree, the unmounted() function is called and we can add code to that function. In this example we create an alert popup box when this component is removed.</p>
</template>

<script>
export default {
  unmounted() {
    alert("The component is removed (unmounted)!");
  }
}
</script>
App.vue:
<template>
  <h1>Lifecycle Hooks</h1>
  <button @click="this.activeComp = !this.activeComp">{{ btnText }}</button>
  <div>
    <comp-one v-if="activeComp"></comp-one>
  </div>
</template>

<script>
export default {
  data() {
    return {
      activeComp: true
    }
  },
  computed: {
    btnText() {
      if(this.activeComp) {
        return 'Remove component'
      }
      else {
        return 'Add component'
      }
    }
  }
}
</script>

<style scoped>
  div {
    border: dashed black 1px;
    border-radius: 10px;
    padding: 20px;
    margin: 10px;
    width: 400px;
    background-color: lightgreen;
  }
</style>
注意: unmounted 階段發生在元件被從 DOM 中移除之後,但在上面的示例中,alert() 在元件消失之前可見。原因是首先將元件從 DOM 中移除,但在瀏覽器將元件的移除渲染到螢幕之前,會發生 unmounted 階段,alert() 變得可見並阻止瀏覽器顯示元件的移除。
“errorCaptured”鉤子
當子/後代元件中發生錯誤時,會呼叫 errorCaptured 生命週期鉤子。
此鉤子可用於錯誤處理、日誌記錄或向用戶顯示錯誤。
示例
CompOne.vue:
<template>
  <h2>Component</h2>
  <p>This is the component</p>
  <button @click="generateError">Generate Error</button>
</template>

<script>
export default {
  methods: {
    generateError() {
      this.$refs.objEl.innerHTML = "hi";
    }
  }
}
</script>
App.vue:
<template>
  <h1>The 'errorCaptured' Lifecycle Hook</h1>
  <p>Whenever there is an error in a child component, the errorCaptured() function is called on the parent.</p>
  <p>When the button inside the component is clicked, a method will run that tries to do changes to a $refs object that does not exist. This creates an error in the component that triggers the 'errorCaptured' lifecycle hook in the parent, and an alert box is displayed with information about the error.</p>
  <p>After clicking "Ok" in the alert box you can see the error in the browser console.</p>
  <div>
    <comp-one></comp-one>
  </div>
</template>

<script>
export default {
  errorCaptured() {
    alert("An error occurred");
  }
}
</script>

<style>
#app > div {
  border: dashed black 1px;
  border-radius: 10px;
  padding: 10px;
  margin-top: 10px;
  background-color: lightgreen;
}
</style>
關於錯誤的更多資訊也可以作為 errorCaptured() 函式的引數捕獲,這些引數是
- 錯誤
- 觸發錯誤的元件
- 錯誤源型別
在下面的示例中,這些引數在 errorCaptured() 函式中被捕獲並寫入控制檯
示例
CompOne.vue:
<template>
  <h2>Component</h2>
  <p>This is the component</p>
  <button @click="generateError">Generate Error</button>
</template>

<script>
export default {
  methods: {
    generateError() {
      this.$refs.objEl.innerHTML = "hi";
    }
  }
}
</script>
App.vue:
<template>
  <h1>The 'errorCaptured' Lifecycle Hook</h1>
  <p>Whenever there is an error in a child component, the errorCaptured() function is called on the parent.</p>
  <p>Open the browser console to see the captured error details.</p>
  <div>
    <comp-one></comp-one>
  </div>
</template>

<script>
export default {
  errorCaptured(error,compInst,errorInfo) {
    console.log("error: ", error);
    console.log("compInst: ", compInst);
    console.log("errorInfo: ", errorInfo);
  }
}
</script>

<style>
#app > div {
  border: dashed black 1px;
  border-radius: 10px;
  padding: 10px;
  margin-top: 10px;
  background-color: lightgreen;
}
</style>
“renderTracked”和“renderTriggered”生命週期鉤子
當渲染函式被設定為跟蹤或監控響應式元件時,renderTracked 鉤子會執行。renderTracked 鉤子通常在初始化響應式元件時執行。
當這種被跟蹤的響應式元件發生更改並因此觸發新的渲染時,renderTriggered 鉤子會執行,以便螢幕用最新更改進行更新。
響應式元件是可以更改的元件。
渲染函式是 Vue 編譯的函式,它跟蹤響應式元件。當響應式元件發生更改時,會觸發渲染函式並重新渲染應用程式到螢幕。
renderTracked 和 renderTriggered 鉤子用於除錯,並且僅在開發模式下可用。
要檢視 renderTracked 和 renderTriggered 鉤子中的 alert() 和 console.log(),您必須將下面示例中的程式碼複製到您的計算機上,並在開發模式下執行該應用程式。
示例
CompOne.vue:
<template>
  <h2>Component One</h2>
  <p>This is a component.</p>
  <button @click="counter++">Add One</button>
  <p>{{ counter }}</p>
</template>

<script>
export default {
  data() {
    return {
      counter: 0
    }
  },
  renderTracked(evt) {
    console.log("renderTracked: ",evt);
    alert("renderTracked");
  },
  renderTriggered(evt) {
    console.log("renderTriggered: ",evt)
    alert("renderTriggered");
  }
}
</script>
App.vue:
<template>
  <h1>The 'renderTracked' and 'renderTriggered' Lifecycle Hooks</h1>
  <p>The 'renderTracked' and 'renderTriggered' lifecycle hooks are used for debugging.</p>
  <p><mark>This example only works in development mode, so to see the hooks run, you must copy this code and run it on you own computer in development mode.</mark></p>
  <div>
    <comp-one></comp-one>
  </div>
</template>

<style scoped>
  div {
    border: dashed black 1px;
    border-radius: 10px;
    padding: 20px;
    margin-top: 10px;
    background-color: lightgreen;
  }
</style>
注意:上面的示例程式碼旨在複製並在開發模式下本地執行,因為 renderTracked 和 renderTriggered 鉤子僅在開發模式下可用。
“activated”和“deactivated”生命週期鉤子
如本頁上方所示,我們有 mounted 和 unmounted 生命週期鉤子用於在元件從 DOM 中移除或新增到 DOM 時。
activated 和 deactivated 生命週期鉤子用於快取的動態元件新增或移除時,但不是從 DOM 中移除。<KeepAlive> 標籤用於下面的示例以快取動態元件。
示例
CompOne.vue:
<template>
  <h2>Component</h2>
  <p>Below is a log with every time the 'mounted' or 'activated' hooks run.</p>
  <ol ref="olEl"></ol>
  <p>You can also see when these hooks run in the console.</p>
</template>

<script>
export default {
  mounted() {
    console.log("mounted");
    const liEl = document.createElement("li");
    liEl.innerHTML = "mounted";
    this.$refs.olEl.appendChild(liEl);
  },
  activated() {
    console.log("activated");
    const liEl = document.createElement("li");
    liEl.innerHTML = "activated";
    this.$refs.olEl.appendChild(liEl);
  }
}
</script>

<style>
  li {
    background-color: lightcoral;
    width: 5em;
  }
</style>
App.vue:
<template>
  <h1>The 'activated' Lifecycle Hook</h1>
  <p>In this example for the 'activated' hook we check if the component is cached properly with <KeepAlive>.</p>
  <p>If the component is cached properly with <KeepAlive> we expect the 'mounted' hook to run once the first time the component is included (must be added to the DOM the first time), and we expect the 'activated' hook to run every time the component is included (also the first time).</p>
  <button @click="this.activeComp = !this.activeComp">Include component</button>
  <div>
    <KeepAlive>
      <comp-one v-if="activeComp"></comp-one>
    </KeepAlive>
  </div>
</template>

<script>
export default {
  data() {
    return {
      activeComp: false
    }
  }
}
</script>

<style scoped>
  div {
    border: dashed black 1px;
    border-radius: 10px;
    padding: 20px;
    margin-top: 10px;
    background-color: lightgreen;
  }
</style>
讓我們擴充套件上面的示例,看看 activated 和 deactivated 鉤子是如何工作的。我們還將使用 mounted 和 unmounted 鉤子,以便我們可以看到 mounted 鉤子在快取元件首次新增時執行一次,而 unmounted 鉤子對於快取元件永遠不會執行。
示例
CompOne.vue:
<template>
  <h2>Component</h2>
  <p>Below is a log with every time the 'activated', 'deactivated', 'mounted' or 'unmounted' hooks run.</p>
  <ol ref="olEl"></ol>
  <p>You can also see when these hooks run in the console.</p>
</template>

<script>
export default {
  mounted() {
    this.logHook("mounted");
  },
  unmounted() {
    this.logHook("unmounted");
  },
  activated() {
    this.logHook("activated");
  },
  deactivated() {
    this.logHook("deactivated");
  },
  methods: {
    logHook(hookName) {
      console.log(hookName);
      const liEl = document.createElement("li");
      liEl.innerHTML = hookName;
      this.$refs.olEl.appendChild(liEl);
    }
  }
}
</script>

<style>
  li {
    background-color: lightcoral;
    width: 5em;
  }
</style>
App.vue:
<template>
  <h1>The 'activated' and 'deactivated' Lifecycle Hooks</h1>
  <p>In this example for the 'activated' and 'deactivated' hooks we also see when and if the 'mounted' and 'unmounted' hooks are run.</p>
  <button @click="this.activeComp = !this.activeComp">Include component</button>
  <div>
    <KeepAlive>
      <comp-one v-if="activeComp"></comp-one>
    </KeepAlive>
  </div>
</template>

<script>
export default {
  data() {
    return {
      activeComp: false
    }
  }
}
</script>

<style scoped>
  div {
    border: dashed black 1px;
    border-radius: 10px;
    padding: 20px;
    margin-top: 10px;
    background-color: lightgreen;
  }
</style>
“serverPrefetch”生命週期鉤子
“serverPrefetch”鉤子僅在伺服器端渲染 (SSR) 期間呼叫。
解釋和建立“serverPrefetch”鉤子的示例需要一個相對較長的介紹和設定,這超出了本教程的範圍。

